
這篇筆記整理了使用 Hugo(靜態網站生成器)搭配 Blowfish主題,管於 GitHub Pages,並在Cloudflare設定網域。
準備#
安裝 Node.js#
Node.js: 前往 Node.js 官網 下載並安裝。
安裝 Hugo#
Hugo (Windows): install Hugo
winget install Hugo.Hugo.Extended安裝Blowfish工具#
使用官方推薦的 CLI 工具來初始化主題,這能簡化很多依賴設定。
提示:詳細步驟可參考 Blowfish 官方文檔。
配置#
Blowfish基礎配置#
站點級配置 (hugo.toml)#
baseURL: 最關鍵的參數。baseURL必須被設置為最終的公開域名(例如https://www.example.com/)。如果設置錯誤,部署後會導致 CSS/JS 路徑失效,網站變成「裸奔」狀態(樣式丟失)甚至出現 404 錯誤。languageCode: 設置為zh-tw,這有利於 SEO 與瀏覽器翻譯識別。
目錄結構解析#
| 目錄名稱 | 功能描述 | 重要性 |
|---|---|---|
| config/ | 存放配置文件 | 強烈建議拆分為多個檔案(如 languages.zh-tw.toml),以支持多語言配置。 |
| content/ | 存放文章內容 | 網站的靈魂。資料夾結構直接對應網址路徑。 |
| static/ | 存放靜態資源 | 這裡的檔案(如圖片、CNAME)會被原封不動複製到發布目錄。 |
| assets/ | 資源處理 | 存放需要的檔案。 |
多語言與選單#
在 config/_default/languages.zh-tw.toml 中定義網站標題與作者資訊;在 menus.zh-tw.toml 中定義導航欄。利用 weight 參數控制排序,數值越小越靠前。
自動化部署:GitHub Pages#
不需要每次手動 build 完再上傳,讓 GitHub Actions 代勞,實現「推代碼即部署」。
建立 Workflow 檔案#
官方文件
請在專案根目錄建立檔案 .github/workflows/gh-pages.yml,並填入自動化部署的配置內容(定義 Build 與 Deploy 到 gh-pages 分支的流程)。
注意需加入 jobs.build-deploy.permissions.contents : write ,否則 Action 會因權限不足而失敗。
# .github/workflows/gh-pages.yml

name: GitHub Pages

on:
  push:
    branches:
      - main

jobs:
  build-deploy:
    permissions:
      contents: write
    runs-on: ubuntu-24.04
    concurrency:
      group: ${{ github.workflow }}-${{ github.ref }}
    steps:
      - name: Checkout
        uses: actions/checkout@v3
        with:
          submodules: true
          fetch-depth: 0

      - name: Setup Hugo
        uses: peaceiris/actions-hugo@v2
        with:
          hugo-version: "latest"

      - name: Build
        run: hugo --minify

      - name: Deploy
        uses: peaceiris/actions-gh-pages@v3
        if: ${{ github.ref == 'refs/heads/main' }}
        with:
          github_token: ${{ secrets.GITHUB_TOKEN }}
          publish_branch: gh-pages
publish_dir: ./public.gitignore#
為了保持 Git 倉庫乾淨,請設定忽略生成目錄與暫存檔。
# Hugo default output directory
/public
/resources/_gen

# Hugo build lock
.hugo_build.lock簡易版的自動提交腳本#
為了節省每次輸入 git 指令的時間,用一個簡單的 PowerShell 腳本 (deploy.ps1):
param(
    [Parameter(Mandatory=$false)]
    [string]$msg = "Site update $(Get-Date -Format 'yyyy-MM-dd HH:mm')"
)

# 執行 git add
Write-Host "正在加入變更至暫存區 (git add)..." -ForegroundColor Cyan
git add .

# 檢查是否有變更需要提交
if ($(git status --porcelain)) {
    # 執行 git commit
    Write-Host "正在提交變更 (git commit)..." -ForegroundColor Cyan
    git commit -m "$msg"

    # 執行 git push
    Write-Host "正在推送至遠端 (git push)..." -ForegroundColor Cyan
    git push

    Write-Host "完成!" -ForegroundColor Green
} else {
    Write-Host "沒有偵測到需要提交的變更。" -ForegroundColor Yellow
}
設定 GitHub Pages 來源#
將代碼推送到 GitHub 後,等待 Action 執行成功,接著必須手動啟用 Pages 服務:
- 進入 GitHub Repo 的 Settings。
- 點擊左側側邊欄的 Pages。
- 在 Build and deployment 區域:
- Source: 選擇
Deploy from a branch。 - Branch: 選擇
gh-pages分支 (如果沒看到,請確認 Action 是否已成功跑完)。 - Folder: 選擇
/ (root)。 - 點擊 Save。
- Source: 選擇
網域綁定:Cloudflare 與 CNAME#
Cloudflare DNS 設定#
購買網域後,使用 Cloudflare 來管理 DNS
Github教學
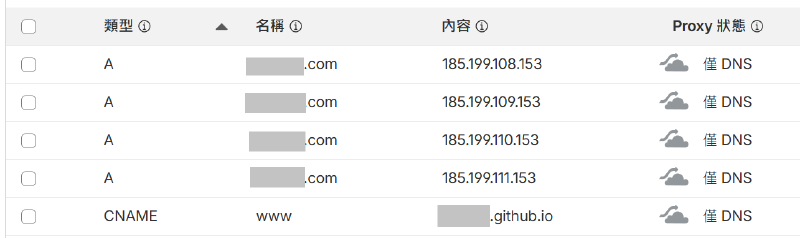
Apex Domain (根域名 example.com): 新增 4 筆
A記錄,指向 GitHub Pages 的專用 IP:185.199.108.153185.199.109.153185.199.110.153185.199.111.153
Subdomain (子域名 www): 新增 1 筆
CNAME記錄:- 名稱:
www - 內容:
<你的GitHub用戶名>.github.io
- 名稱:
關鍵一步:手動建立 CNAME 文件#
這是一個極易被忽略!
當你在 GitHub 網頁上設定 Custom Domain 後,GitHub 會自動產生一個 CNAME 檔。但因為我們的部署流程是「每次重新生成並覆蓋」,下一次 Hugo 部署時,這個檔案會被刪除,導致網域失效。
解決方案:
必須在本地專案的 static/ 目錄下手動建立一個名為 CNAME 的檔案(無副檔名),內容只需一行,請填入你的網域,範例如下:
example.com**原理:**Hugo 在構建時,會將 static/ 目錄下的所有文件原封不動地複製到 ./public。這確保了每次 Action 構建後,CNAME 文件都會存在,從而持久化網域綁定配置。
GitHub Pages 設定#
回到 GitHub Repo 的 Settings > Pages > Custom domain,填入你的網域(如 example.com),等待 “DNS check successful”。
總結與檢查清單#
完成上述步驟後,你的網站應該已經順利上線了。最後,請對照這份清單進行最終確認:
hugo.toml: baseURL 是否已改為你的正式網域?
static/CNAME: 文件是否存在且內容正確?
GitHub Settings: Pages 頁面是否顯示 “DNS check successful”?